According to HotHardware.com there are signs that Microsoft will start supporting Galileo with a new “Windows on Devices” version that targets IoT and other smart devices. Why is this noteworthy? Well, this would in fact mean that the PC-era “Wintel” team is entering the Maker scene with their newly paired product offerings supporting an Arduino Maker platform.
This is certainly a welcome move as it broadens the choice of platforms and products Makers have to use in their project.
Intel
Is 3D Vision ready for prime time?
One of the exiting fields of embedded computing is 3D vision. The Microsoft’s Kinect is certainly the premier consumer product in this category. However, if things go according to Intel’s CEO Krzanich Kinect will soon get company. At his CES 2014 presentation he showed off RealSense scanning and gesture control technologies and announced the roll-out of this technology during 2014 with SDK becoming available soon.
Intel is not alone looking at this space. TI is also active in 3D Vision. However, their focus is more on Automotive rather than consumer devices. For those interested to look behind the scene of 3D technology, there is a video interview by Jeff Bier, founder of the Embedded Vision Alliance, that presents some live 3D feeds and explanations by Goksel Dedeoglu, Manager of Embedded Vision R&D at Texas Instruments.
Combining 3D Vision with Infra-Red (IR) imaging technology as showcased in the video below and it is easy to imagine what exiting opportunities are out there.
I agree that some of these technologies are out of reach for a typical DIY Maker. However, as in the past these technologies will come down in their price points and get more accessible to the masses quickly. One 3D Photo/Movie example can be found in Make Magazin. So it is never too early to start imagine what to do with it.
Galileo is different, is it?
There a quite a number of Arduino boards available. The original Arduinos all used 8-bit AVR micro-controllers from Atmel. Recently Arduino adopted 32-bit ARM cores. In this post I want to look at the features of the Galileo board. The Board is about double the size of an original Arduino board and built around the Intel Quark X1000 controller.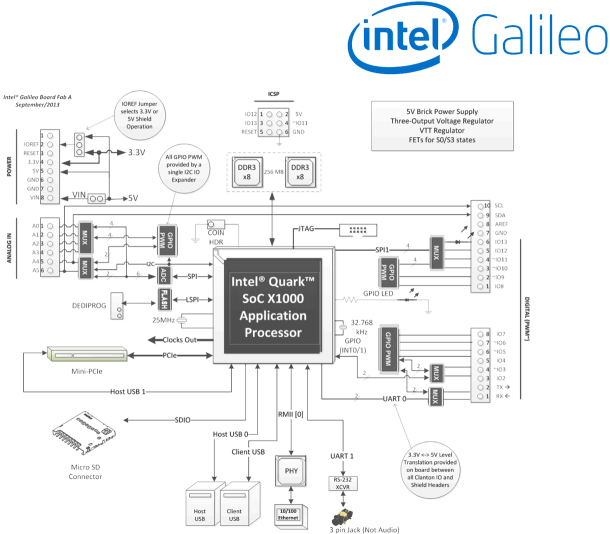 The Quark family of Intel chips are the new low cost line of x86 controllers that are positioned below the Atom cores. Quarks are elementary particles that make up the atomic nucleus. Intel positions the Quark family for Internet of Things (IoT) applications. The X1000 controller is the first member of this line. The X1000 offers:
- 400 MHz 32-bit x86 CPU
- 512 Kbyte ECC protected embedded SRAM
- Up to 2Gbyte external ECC protected DDR3 memory
- 10 /100 Mbps Ethernet port with RMI interface
- 2 x PCI Express Rev 2.0 ports offering up to 2.5 GT/s data transfer rates
- 2 x USB 2.0 Host ports
- 1 x USB 2.0 Device port
- SDIO card interface
- 2 x I2C Master interfaces up to 400 Kbit/s
- 16 x GPIO
- 2 x SPI Master controllers
- 2 x 16550 compliant UART supporting baud rates from 300 to 2764800
- Real Time Clock (RTC)
The controller is packed into a Flip-Chip Ball Grid Array (FCBGA) package with 393 solder balls that come with a 0.593 mm ball pitch. The package dimensions are 15mm x 15mm. With this kind of a package hand soldering is out of the picture.
Noteworthy is the implementation of the Arduino shield interface. The interface is pretty much designed with external components. For the GPIO/PWM digital shield pins a Cypress CY8C9540A 40-Bit I/O Expander with EEPROM is used. The analog shield pins use an Analog Device AD7298 8-Channel, 1 MSPS, 12-Bit SAR Analog to Digital Converter (ADC) with Temperature Sensor . The Quark controller uses I2C serial interface to control the PGIO/PWM CY8C9540A device and the SPI for the ADC AD7298.
Galileo is coming to town
Today I received my Intel Galileo board that I ordered sometimes in October from Mouser. The shipment date was initially mid November but got pushed back a few times. Anyway, I was planning to toy around with it over the holidays and was thrilled when it shipped December 24th. Galileo must have called Santa and put in a good word.
The board comes in a nice box together with a power supply. I wish it had stand-offs to provide some support when sitting on a table. This would prevent the board from resting on the mini-PCI card slot tips mounted on the back-side of the board. Those tips look like they could easily break off.
Anyway I will try to document the journey to get the board up and running.
For the documentation and software just head over to www.intel.com/support/go/galileo and download the related build for your OS. Intel supports 32/64 bit Linux, Windows and MacOS-X. The release as of this writing is 1.5.3 and gets delivered as a Zip-archive.
Downloading the Windows version and unzipping it with the stock Windows un-zipper produced an error because of too long file names in git related files. Using 7-Zip however completed without a hick-up (see also the Galileo Getting Started Guide) .
The next step is to plug in the power supply and connect the Client-USB port with a micro USB cable to your computer. Once the Galileo USB port is detected by your computer (it shows up under “Gadget 2.4”) you must install the related serial drive. It can be found in the IDE installation directory under ./hardware/arduino/x86/tools/linux-cdc-acm.inf . Now it is time to start the arduino IDE and perform a firmware update. You can find the menu entry under Help->Firmware Update.