There a quite a number of Arduino boards available. The original Arduinos all used 8-bit AVR micro-controllers from Atmel. Recently Arduino adopted 32-bit ARM cores. In this post I want to look at the features of the Galileo board. The Board is about double the size of an original Arduino board and built around the Intel Quark X1000 controller.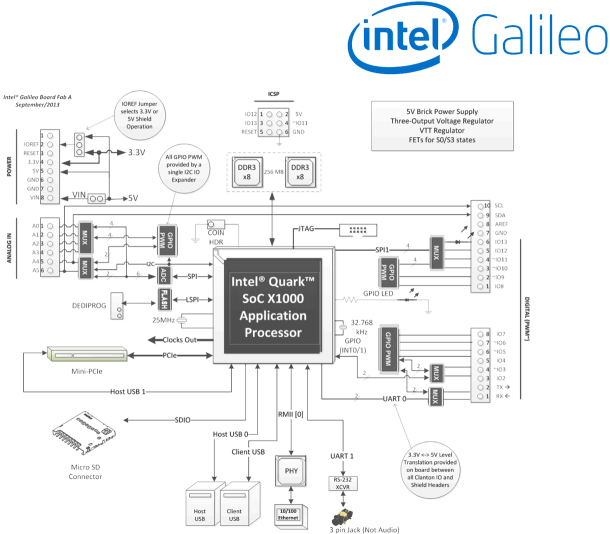 The Quark family of Intel chips are the new low cost line of x86 controllers that are positioned below the Atom cores. Quarks are elementary particles that make up the atomic nucleus. Intel positions the Quark family for Internet of Things (IoT) applications. The X1000 controller is the first member of this line. The X1000 offers:
- 400 MHz 32-bit x86 CPU
- 512 Kbyte ECC protected embedded SRAM
- Up to 2Gbyte external ECC protected DDR3 memory
- 10 /100 Mbps Ethernet port with RMI interface
- 2 x PCI Express Rev 2.0 ports offering up to 2.5 GT/s data transfer rates
- 2 x USB 2.0 Host ports
- 1 x USB 2.0 Device port
- SDIO card interface
- 2 x I2C Master interfaces up to 400 Kbit/s
- 16 x GPIO
- 2 x SPI Master controllers
- 2 x 16550 compliant UART supporting baud rates from 300 to 2764800
- Real Time Clock (RTC)
The controller is packed into a Flip-Chip Ball Grid Array (FCBGA) package with 393 solder balls that come with a 0.593 mm ball pitch. The package dimensions are 15mm x 15mm. With this kind of a package hand soldering is out of the picture.
Noteworthy is the implementation of the Arduino shield interface. The interface is pretty much designed with external components. For the GPIO/PWM digital shield pins a Cypress CY8C9540A 40-Bit I/O Expander with EEPROM is used. The analog shield pins use an Analog Device AD7298 8-Channel, 1 MSPS, 12-Bit SAR Analog to Digital Converter (ADC) with Temperature Sensor . The Quark controller uses I2C serial interface to control the PGIO/PWM CY8C9540A device and the SPI for the ADC AD7298.