Cloud

A DIY security video camera recorder (part 1) – the missing newspaper

2015-04-28 10.56.31-3Over the last few month 1-2 a week our newspaper was missing. This, most of the mornings, really ticket me off as it disrupted my breakfast routine. A while later I got a letter from the courier announcing that in our neighborhood newspapers get stolen.
I need my morning newspaper even though there is hardly any news in there. I considered cancelling the subscription but realized that I was not ready to let go of this habit. I also grew curious who would steal newspapers when most of the news was freely available on-line. Maybe one of my lovely neighbors had a dark side. So I took the challenge and set out to solve this mystery.
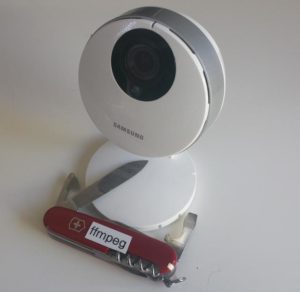
I ordered a Samsung SNH-P6410BN in-door and Samsung SNH-E6440BN outdoor wireless IP security camera. These are really great Hi-Def cameras with a wide field of view and good picture quality during daylight as well as at night.
The camera comes with pretty decent cloud support and an Android and iPhone app. It can store the video feeds to microSD cards that can be inserted into the cameras.  However I did not want to fiddle with SD-cards as the camera is connected to my network and I hoped that additional software could help me out.
I was intrigued by 3rd party Video Software like BlueIris that could in fact connect to my cameras video streams.
While setting up my camera with BlueIris I realized that the camera is able to stream video in any of the following resolutions:

Video Profile 6: h264 (Baseline), yuv420p, 640x360, 30 tbr, 90k tbn, 180k tbc
Video Profile 5: h264 (Baseline), yuv420p, 1920x1080, 30 tbr, 90k tbn, 180k tbc
Video Profile 4: h264, yuv420p, 1280x720, q=2-31, 90k tbn, 90k tbc:
Video Profile 3: h264 (Baseline), yuv420p, 640x360, 30 tbr, 90k tbn, 180k tbc
Video Profile 2: h264 (Baseline), yuv420p, 640x360, 10 fps, 10 tbr, 90k tbn, 180k tbc
Video Profile 1: mjpeg, yuvj420p(pc, bt470bg/unknown/unknown), 1920x1080 [SAR 1:1 DAR 16:9], 1 tbr, 90k tbn, 90k tbc

This is no where documented in the product manual that shipped with the camera.  Anyway, I managed to open the camera streams in VLC and watch the live feed using a URL like this:

rtsp://admin:YOUR_PASSWORD@192.168.1.100/profile5/media.smp

However I was mostly interested in dumping these streams to a hard drive so that I could zap through them with VLC. That is when I started to look into ffmpeg.
What a tool this is! The Swiss-Army knife of Video. Is there something that cannot be done with this utility? However, the flexibility comes at a price. There are so many options and parameters that exploring them feels like an entry riddle to a secret society. That said, the ffmpeg user community is large and there are many example and posts that are available on the internet to get you started.
So here is a simple command that dumps my stream:

ffmpeg -i rtsp://admin:YOUR_PASSWORD@192.168.1.100/profile5/media.smp -vcodec copy VideoDump.mp4

This line dumps the input video stream into the file VideoDump.mp4. The option “-vcodec copy” makes sure that the stream is not re-coded so the process hardly takes any CPU resources. This worked really well. However the files started to become big as a 1920×1080 stream uses about 1 GByte of hard disk space per hour. Is there a way to split the files into 1hour segments? You bet!
The following command line will dump segments of 1 hour:

ffmpeg -i rtsp://admin:YOUR_PASSWORD@192.168.1.100/profile5/media.smp -vcodec copy -segment_time 3600 -segment_time_delta 0.03 -reset_timestamps 1 VideoDump_%03d.mp4

The segment time is specified with the option “-segment_time 3600” that takes seconds as the argument. The option “-segment_time_delta 0.03″ allows the utility some 0.03 second flexibiliy where to cut a segment so it can do it at a key frame. The option ” -reset_timestamps 1″ will reset the time inside a segment to start at 00:00. Also the segments get numbered. The segment files are named like this:

VideoDump_000.mp4
VideoDump_001.mp4
VideoDump_002.mp4
 :
 :

The amount of video data I collected was rapidly growing and I was interested to start and turn off the capturing at define moments. Sure ffmpeg can do this:

ffmpeg -i rtsp://admin:YOUR_PASSWORD@192.168.1.100/profile5/media.smp -vcodec copy -segment_time 3600 -segment_time_delta 0.03 -reset_timestamps 1 -ss 00:00:00 -t 02:30:00 VideoDump_%03d.mp4

Adding the option “-ss 00:00:00 -t 02:30:00” will capture 2.5 hours of footage and then stop. I then used a cron job on my Mac to start the stream capturing.

In summary ffmpeg works great with the Samsung IP cameras and allows to capture videos exactly during the hours of interest.

So coming back to the missing newspaper, you wonder who the culprit was? Well to my surprise there was no thief. The footage clearly revealed that the newspaper never got delivered the days it was “stolen”.
Logging Weather Data to the Cloud

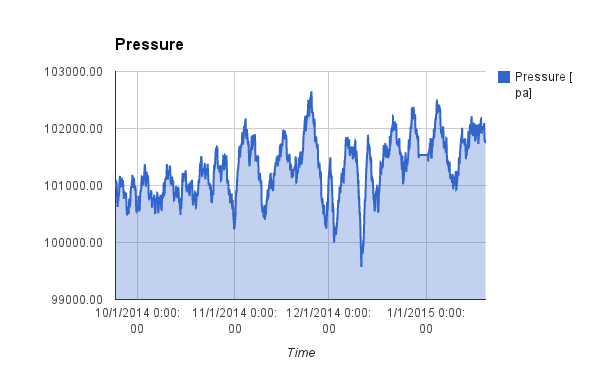
In this post I want to report some of the finding from a 4 month experiment with a Spark Core. The core is uploading pressure measurement values into the cloud every five minutes. It then loggs them into a Google Spreadsheet. I use the Spark Temboo library and service after I failed to reliably poll the core from Google.
Anyway the Spreadsheet has now more than 30,000 entries. The chart generation is a bit slow but everything is still running stable to this day. A plot of the 4 month is shown below:
Temboo
After a measurement is taken the core goes to deep sleep to conserve energy. An STM103 internal HW timer interrupt is used to wake-up in time for the next measurement.
Over the four month I have seen only a few corrupted values. These are most likely transmission errors due to network connectivity issues.

Updated Temboo library available

I finally found some time to fix the problems with the Spark Temboo library. The following issues were fixed:

  • mib(), max() definition clash between the STL library and the Spark Wiring math library.
  • Misc makefile fixes to build the library from a shell

The updated source code is available at Github under https://github.com/bentuino/temboo.git Thanks to all the notes and hits I received from the community.

Temboo ignited with a Spark

This is a re-post of an article I wrote as a guest blogger for Temboo’s blog.
I am working with connected devices and was looking for a cloud service. While surveying the field Temboo caught my eye because of the large number of supported premium web sites and the promise to connect IoT devices to the Internet in a breeze.
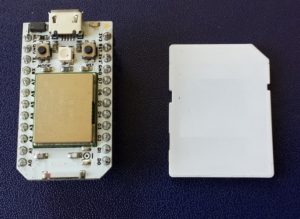
spark_size The connected device I am using is a Spark Core. The Spark Core is a sleek small board that offers a powerful 32 bit ARM CPU paired with WiFi. The product grew out of a Kickstarter campaign and is rapidly gaining in popularity. The Spark is nicely priced and everything is open source. The team supporting the Spark Core is smart and supportive and made a great choice to port most of the main Arduino APIs to their platform.
As outline in a blog post here migrating Arduino Libraries to the Spark Core often turns out to be pretty easy. With Temboo providing an open source library for Arduino I was tempted to give it a try. However, I had no Temboo-Arduino setup so I was not sure how hard it would be to get it all up and running.
Well, I am happy to report that is was easier than expected. Temboo’s code is well written. I only had to work around some AVR specific optimizations that Temboo did to save program memory. As the Spark Core is built around a STM32F103 chip resources are not as tight as with the AVR so I simply bypassed these optimizations.
Here are some brief instructions how to install the Temboo Arduino Library. The instructions use the Spark command line SDK setup:

  1. Download the modified Temboo Arduino Library source code from github:
    mkdir temboo
    cd temboo
    git clone https://github.com/bentuino/temboo.git
  2. Get the Spark Core firmware:
    git clone https://github.com/spark/core-firmware.git
    git clone https://github.com/spark/core-common-lib.git
    git clone https://github.com/spark/core-communication-lib.git
    // Merge the two source codes
    cp -fr core-* temboo
    rm -fr core-*
  3. In older Spark firmware there is a small problem that the spark team already fixed. Open the file core-firmware/inc/spark_wiring_ipaddress.h and uncomment the line 54 with your favorite editor:
    // Overloaded cast operator to allow IPAddress objects to be used where a pointer
    // to a four-byte uint8_t array is expected
    //operator uint32_t() { return *((uint32_t*)_address); };
    bool operator==(const IPAddress& addr) { return (*((uint32_t*)_address)) == (*((uint32_t*)addr._address)); };
    bool operator==(const uint8_t* addr);
  4. Save your TembooAccount.h you generated with DeviceCoder to temboo-arduino-library-1.2\Temboo
  5. Now it is time to build the Spark application:
    cd temboo/core-firmware/build
    make -f makefile.temboo clean all
  6. Connect your Spark Core to your computer via a USB cable
  7. Push both buttons, release Reset button and continue holding the other button until RGB-LED lights up yellow
  8. Download application into Spark Core
    make -f makefile.temboo program-dfu

Temboo Examples

Two simple Spark application examples are included:

  • core-firmware/src/application_gxls.cpp – Example demonstrates the Temboo library with Google Spreadsheet
  • core-firmware/src/application_gmail.cpp – Example demonstrates the Temboo library with Gmail

to change the example that is built, edit the first line in the core-firmware/src/build.mk file:

CPPSRC += $(TARGET_SRC_PATH)/application_gxls.cpp

or

CPPSRC += $(TARGET_SRC_PATH)/application_gmail.cpp

Building this code was tested under Windows 8.1 using cygwin and the MINGW version of the ARM GCC compiler tool chain. It should be easy to use this Temboo Library with the Spark Cloud based SDK. To configure the Library to support Spark all the is required is to define the following label:

CFLAGS += -DSPARK_PRODUCT_ID=$(SPARK_PRODUCT_ID)

or add a

#define SPARK_PRODUCT_ID SPARK_PRODUCT_ID

to the source code. Temboo support for the Spark Core is a lot of fun. It is easy to setup your own Temboo account and compile the Temboo Arduino Library that now supports the Spark Core platform. To learn more about similar projects please visit my blog at http://bentuino.com.

Google polls Spark Core

appsIn a previous blog post I was describing an example of how a Spark Core can be used to read weather sensors. The setup was really no different from any simple Arduino Uno setup. It only demonstrated how easy it is to port Arduino Sketches to a Spark Core.
With the integrated WLAN I was interested to connect the Spark Core to the internet cloud. One of the simplest ways I found, was using Google’s Spreadsheet service. I stumbled over this idea in this Spark forum post.
Here is how it works: a Google Script is periodically reading data from the Spark Core via the RESTful Spark API and then appends the data to a Spreadsheet. The code below is a minimalistic Spark code to test the such a setup:

int variable = 1634;
void setup() {
  Spark.variable("variable", &variable, INT);
}
void loop() {
  variable++;
  delay(5000);
}

It publishes a variable for cloud access and then increments it in regular intervals. Together with the following Google script I was able to quickly pull data from my core.

function collectData() {
  var  sheet = SpreadsheetApp.getActiveSheet();
  var sensor = UrlFetchApp.fetch("https://api.spark.io/v1/devices/<id>7/variable?access_token=<token>");
  // parse the JSON the Core API created
  var sensor = JSON.parse(sensor.getContentText());
  // you'll need to unescape before your parse as JSON
  var sensor_result = unescape(sensor.result);
  // create a time stamp
  var d = new Date();
  // append data to spreadsheet
  sheet.appendRow([d, sensor_result]);
}

However when I setup a time trigger to run the script in regular intervals I found the setup to be very unreliable. This is discussed and documented by several Spark Users and as of this writing I have not seen a fix for this problem.
One thing to note is, that this approach is pulling data from the Spark Core rather than the core pushing them to the cloud. This has a significant flaw as we cannot put the core into standby between the measurement intervals. Therefore this solution is anyway not a good choice for low power applications.
So stay tuned, I am experimenting with a better solution that I will blog about in my next post.